TLDR RNA-seq
Throughout the data analysis process, there are many steps that we must repeat. These are often steps like removing adapter sequences, aligning reads, running QC, quantifying gene counts, and much more. Pipeliner is a pipeline runner. This means that those repetitive steps we needed to run before are now automated. With Pipeliner, you can run the same best-practices NGS pipelines developed, tested, and benchmarked by experts at CCBR and NCBR.
Quick Start
This section contains information for launching and setting up Pipeliner, and it also contains detailed steps for running the following Quantification and Quality-control pipeline.
Launch Pipeliner
To get started with the tutorial please, login into Biowulf with X11 forwarding enabled:
# Step 0. Login
ssh -Y $USER@biowulf.nih.gov
Although it is not required, we recommend running Pipeliner from an interactive node. This will speed up certain steps that require some overhead later like dry-running the pipeline. You can get an interactive node on Biowulf by running the following command.
# Recommended Step
sinteractive --mem=16g --cpus-per-task=4
To see a complete listing of available Pipeliner modules on Biowulf, please run the following command:
# Optional Step
module avail ccbrpipeliner
ccbrpipeliner/4.0.2. Please note that we use semantic versioning for each of our releases so version major versions will not be compatible with each other (i.e. 3.0 is not compatible with 4.0). Please keep a note of the Pipeliner version that you are using for all of your analysis needs. As previously mentioned, we will be using 4.0.2. Please load that module into your environment:
# Step 1.) Load Pipeliner
module load ccbrpipeliner/4.0.2
$PATH. Please note: If you do not give an exact version, the default version will be loaded into your environment. The default version is not guaranteed to stay the same so it is generally better to explicitly provide an exact version to load.
You are now ready to start Pipeliner's graphical user interface. To start the GUI, please run the following command:
# Step 2.) Launch Pipeliner
ccbrpipe.sh
ccbrpipe.sh, you should now see Pipeliner's user interface: 
Please note: If you receive a message stating
_tkinter.TclError: no display name and no $DISPLAY environment variable, this may be due to logging into Biowulf without enabling X11 forwarding. Please see our FAQ for more information.
Setup Pipeliner
In this section we assume, you have successfully Launched Pipeliner.
Step 0.) Enter required fields in Project Information
Please fill out the following required fields: Project Id and Email Address.
Step 1.) Select Pipeline Family and Genome in Global Settings
From the Pipeline Family drop-down, please select rnaseq. From the Genome drop-down, please select a reference genome. You can find more information about each available reference genome on our resources page. Once selected, a new RNAseq tab will appear.

Step 1.) Provide PATHS
To run the pipeline, you will need to provide two PATHS: 1. Data Directory: an existing PATH on the filesystem to your raw data (i.e. FASTQ files) - Files must adhere to our naming convention. Please see the rules below for naming your files.
2. Working Directory: PATH to the analysis output - If this is your first time running the pipeline for a given set of samples, this should be a new PATH on the filesystem (i.e. Pipeliner will create this folder when selecting Initialize Directory and copy over its required resources into this PATH). If you are carrying on your analysis, this will be the same directory you initialized in a previous run of Pipeliner.
Please note: Pipeliner expects input files to follow a specific naming convention: basename.R1.fastq.gz, basename.R2.fastq.gz. FastQ files should end with the following extensions:
.R1.fastq.gzand.R2.fastq.gz.
Within basename, there are additional conventions you must follow. Please carefully read through all the rules for creating filenames.
Rules for naming raw data files
| Rule | Description | Good Name | Bad Name |
|---|---|---|---|
| 1 | Filenames CANNOT contain spaces | Tumor_SC | Tumor SC |
| 2 | Filenames CANNOT contain hyphens: - | WT_rep1 | WT-rep1 |
| 3 | Filenames CANNOT start with a number | t_ea | 1_t_ea |
| 4 | Filenames CANNOT contain the strings sample, R1 or R2 | Tumor_SC | sample_SC |
| 5 | Filenames can contain underscores: _ | T_S26_WT | T_S26-SC |
Run Quantification and Quality-control pipeline
In this section we assume, you have successfully Launched Pipeliner and Setup Pipeliner.
Step 0.) Select pipeline
To run this pipeline, select Quality Control Analysis from the Pipeline field in the Options section.
Optional
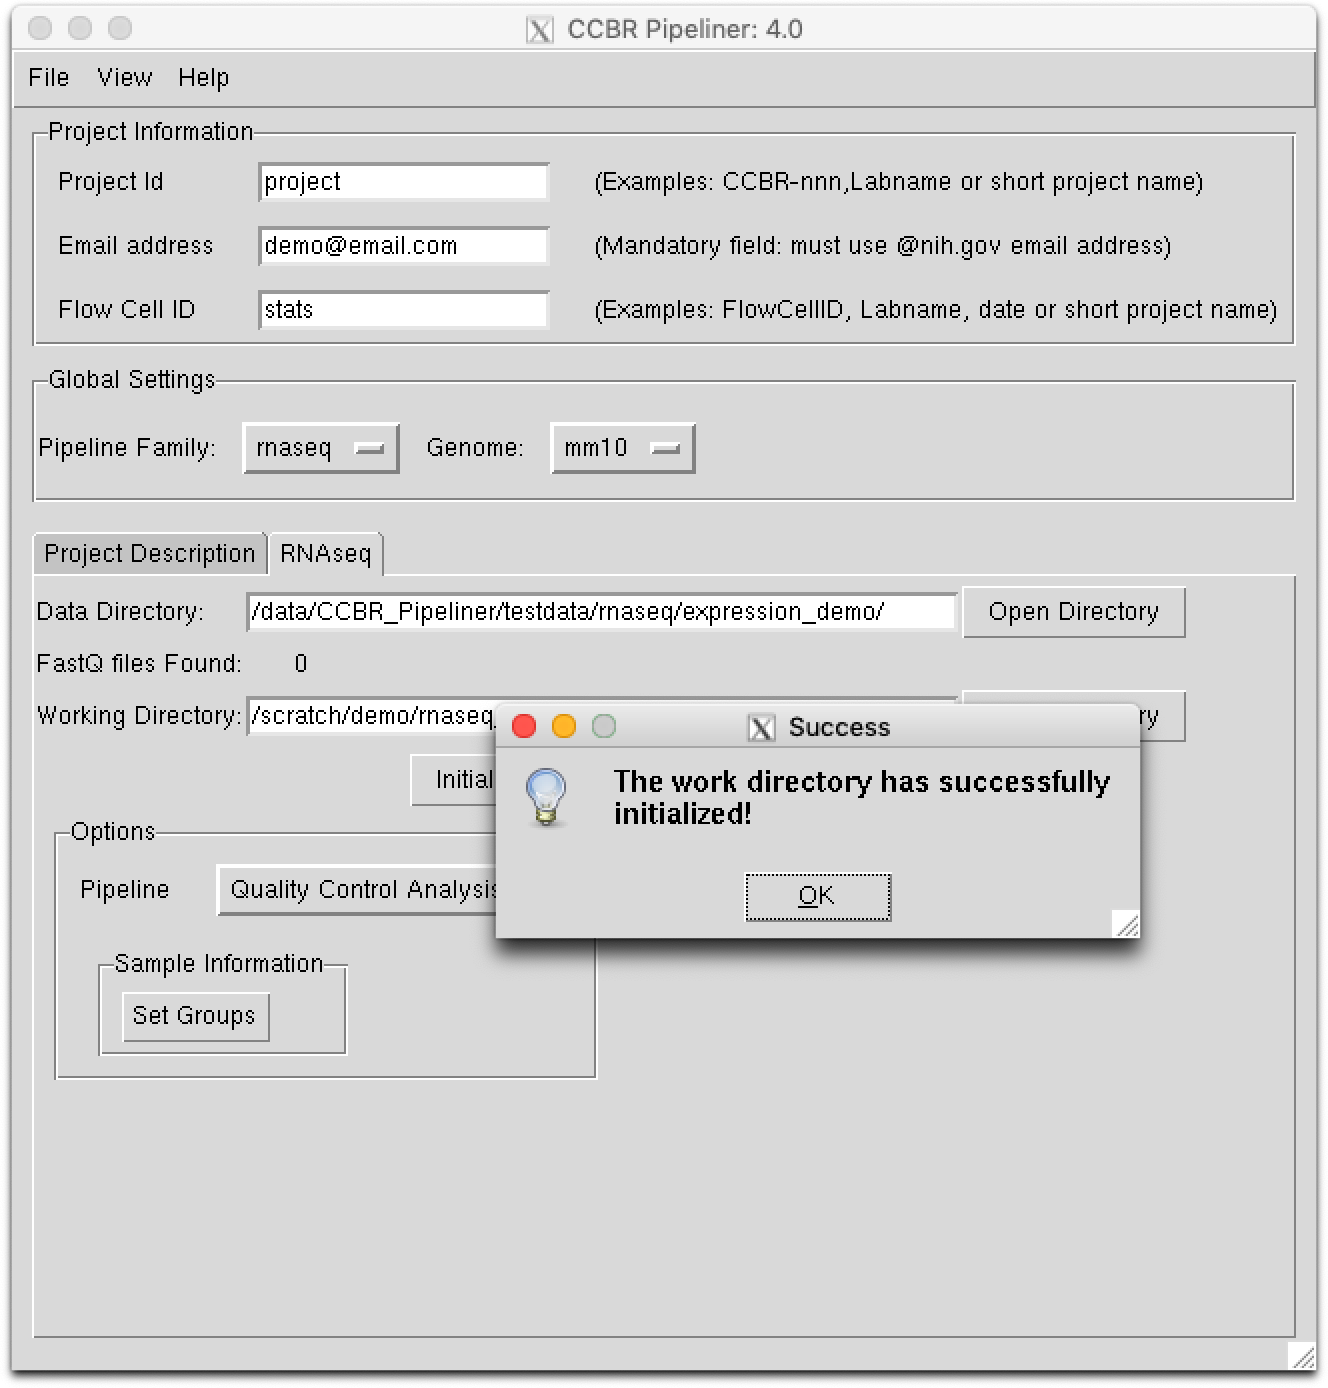
If this the first time running the pipeline for a given set of samples, you will need to initialize your working directory. Please click the Initialize Directory button.
Please note: This will create the directory you defined in the
Working Directoryfield. You only need to do this one time for any user-definedWorking Directory. Please do not click this button again after the directory has been initialized or when you run the second half of the RNA-seq pipeline (Differential Expression pipeline).
Step 1.) Understanding required sample metadata
Next, you will need to provide groups.tab file. The groups.tab is a tab-delimited sample sheet file with three required columns. This file contains metadata for each sample. Here is an example:
Wildtype_S1 WT  WT_1
Wildtype_S2 WT  WT_2
Knockout_S1 KO  KO_1
Knockout_S2 KO  KO_2
Description of each groups.tab column
Contains the basename for each sample.
A basename is the raw data's filename without the following extensions: .R1.fastq.gz, .R2.fastq.gz. If you have paired-end data, you should only have one line in the groups.tab file for each sample.
Pattern: basename.R{1,2}.fastq.gz
Example:
Input: A paired-end sample has the following raw data filenames:
$ ls

> WT_rep_1.R1.fastq.gz  WT_rep_1.R2.fastq.gz
Output: Given the following raw data filenames, the basename would be:
WT_rep_1
Contains group information for each sample.
This information is used for coloring plots and for defining groups of samples in differential expression analysis.
Example:
Input: A group of samples have the following raw data filenames:
$ ls

> WT_rep_1.R1.fastq.gz  WT_rep_1.R2.fastq.gz WT_rep_2.R1.fastq.gz  WT_rep_2.R2.fastq.gz
Output: Given the following raw data filenames, the group name might be:
Wildtype
Contains label information for each sample.
This field is used for creating an alias for each sample. The information in this column is used to create abbreviated sample names (or labels) when figures are generated.
Example:
Input: A group of samples have the following raw data filenames:
$ ls

> WT_rep_1.R1.fastq.gz  WT_rep_1.R2.fastq.gz WT_rep_2.R1.fastq.gz  WT_rep_2.R2.fastq.gz
Output: Given the following raw data filenames, the labels might be:
WT_1
WT_2
Creating a groups.tab file is easy! You can use your text editor of choice to create the file.
Please note: If you use excel to create your groups file, you could run into some unexpected problems. Even after saving a file as TSV in excel, Microsoft products tend to add a new-line character that is not posix-compliant. You may need to run a tool like
dos2unixon your file to fix this problem. As so, it is best to use a real text editor when creating this file. There are many free, open-source options: emacs, nano, neovim, vim, doom, evil, spacemacs, VS Code, Sublime Text, Atom, Text Wrangler, TextMate, Notepad++, etc.
It is also worth noting that you can have more than two groups in your groups.tab; however, the relationship between sample and group must be 1:1. This means that you cannot have a sample belonging to more than one group.
Again, the first column represents the sample's basename (filename without the .R?.fastq.gz extension); the second represents the sample's group; and, the third column represents an alias/label (an abbreviation) used for plotting figures.
Step 2.) Providing sample metadata
There are two ways to provide Pipeliner with group information:
1. Select Set Groups from the Sample Information section. Paste the group information from your text editor into the pop-up box and click save.
2. Create or copy a file called groups.tab in your working directory, then select Set Groups from the Sample Information section and click load + save.

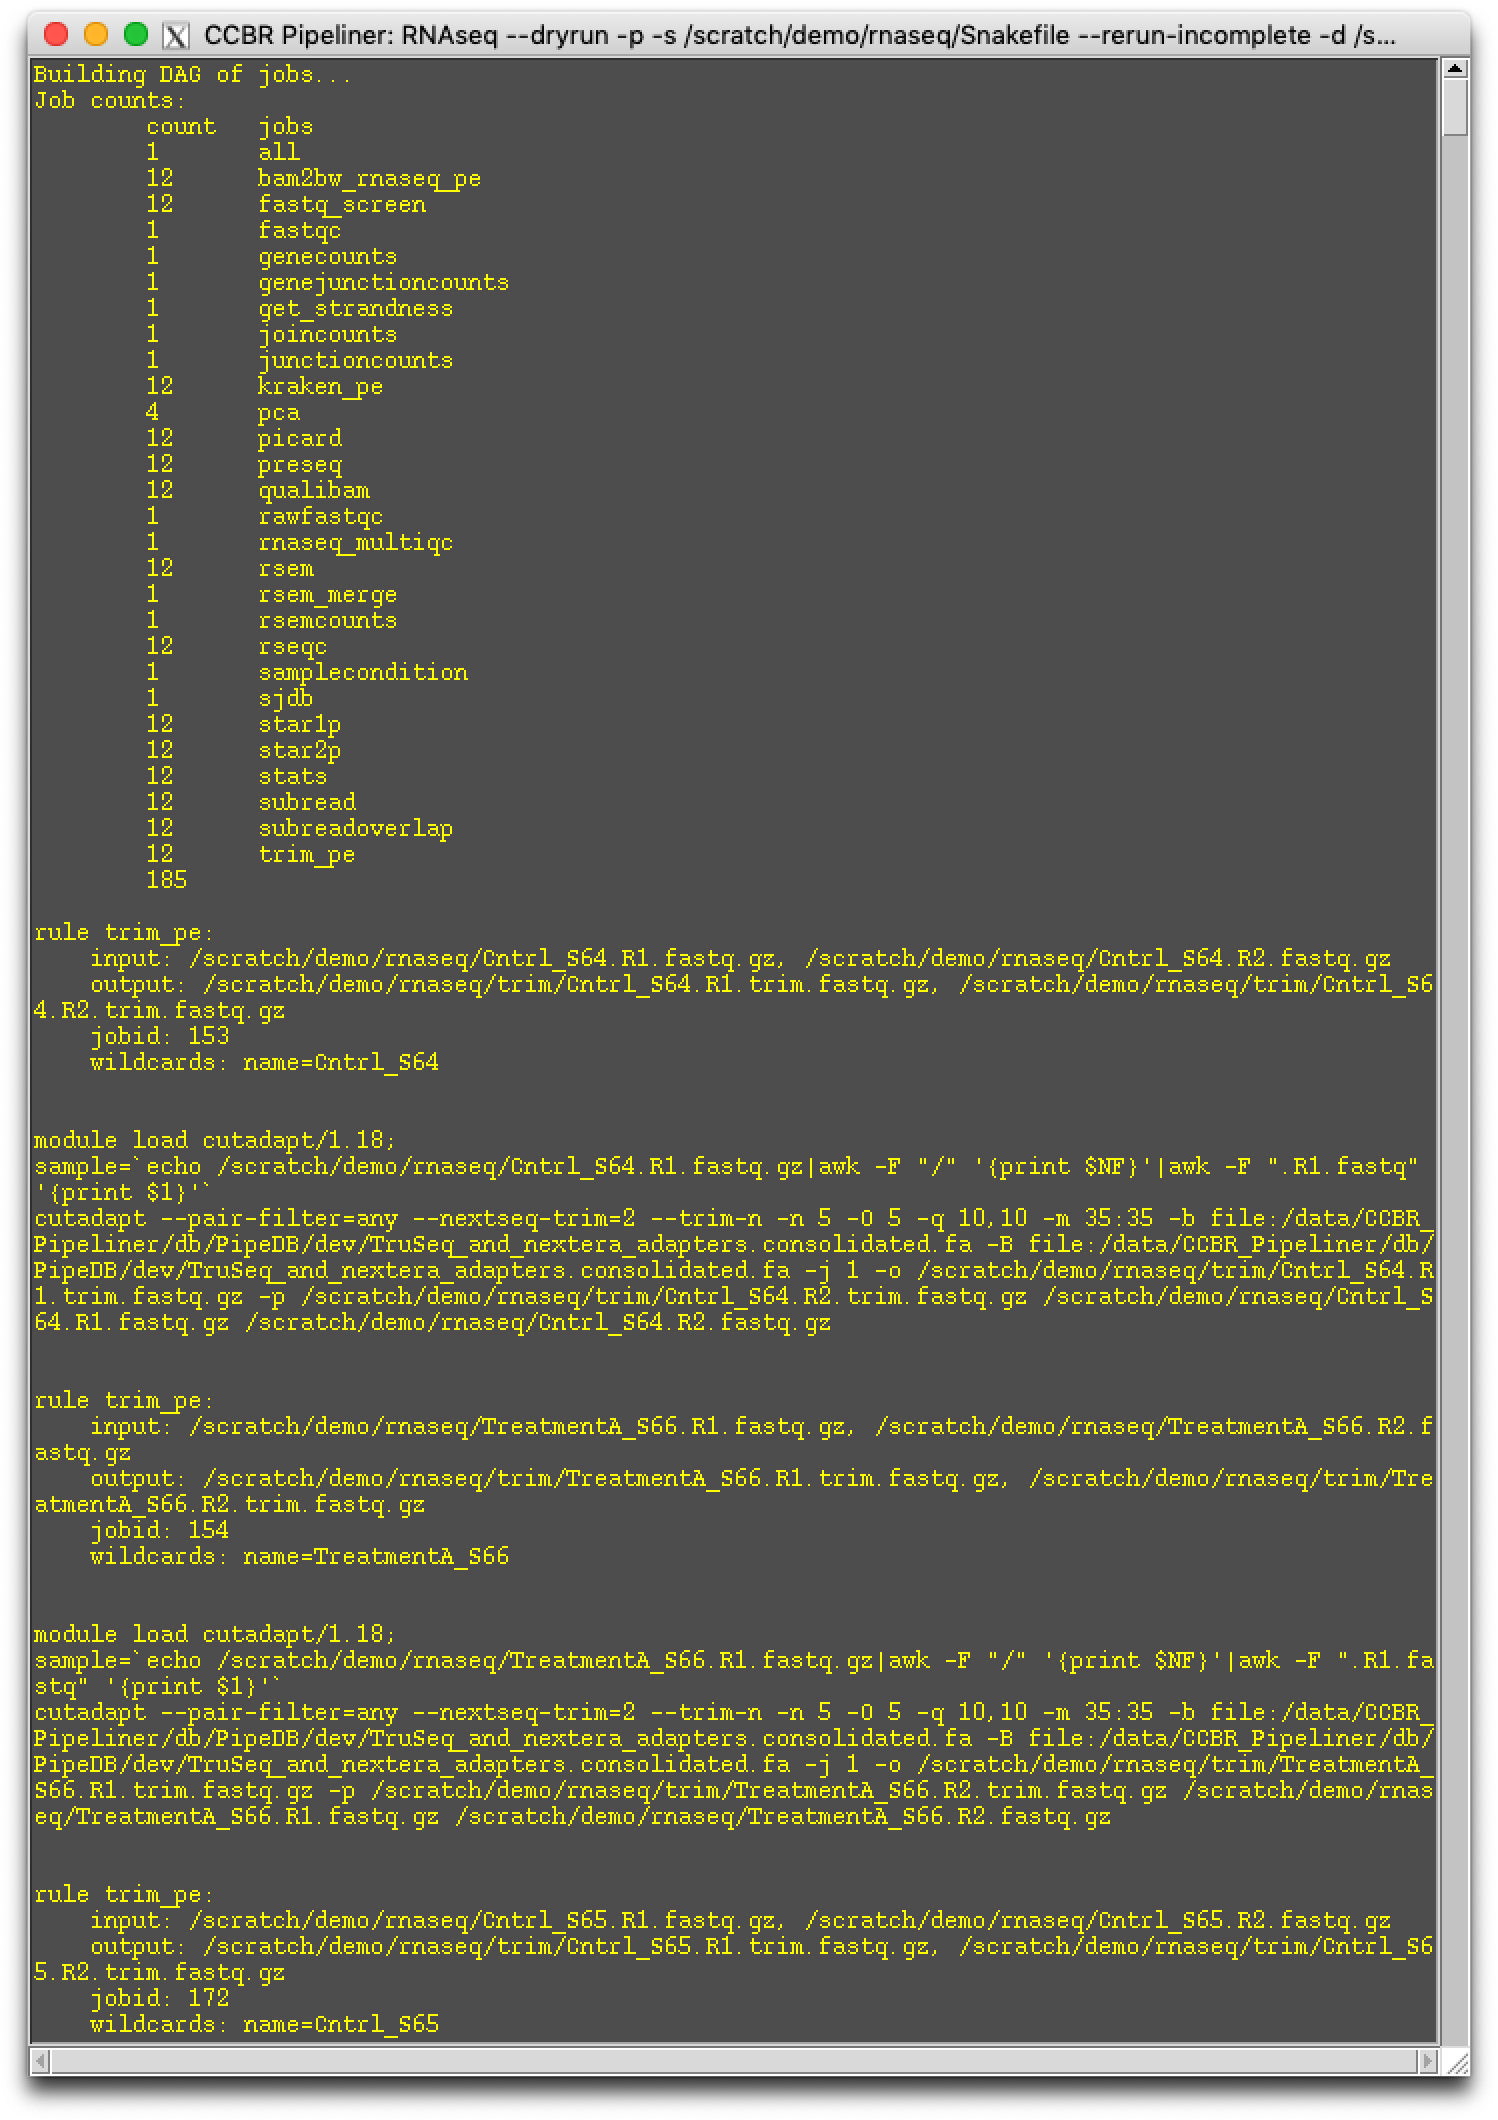
Step 3.) Dry-run the pipeline
Please select the Dry-run button. This will generate the pipeline's Snakefile, run.json, and it will dry run the pipeline.

Step 4.) Run the pipeline
You are now ready to run the pipeline. Please select the Run button. In a few moments, a pop-up box will appear stating that the job is starting. Please select OK.